
BREAD BAKING
TIPS - Temperature and the Craft of Bread Baking
Controlling temperature in the bread baking process produces
consistent professional results. Temperature monitoring is part of the craft of
bread baking. Get a thermometer and use it. I still measure
temperature to this day when I bake. It might sound a bit compulsive, but
temperature control makes a big difference.
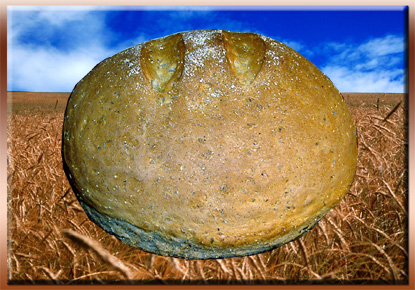
I made a loaf of my signature seven pound pumpernickel rye for pot luck a few days ago. I
wanted the loaf to really impress my friends. As I describe the process note all
the little things I did to control the temperature. Experienced bread bakers and novices alike will pick up a few tricks and get
a bit closer to making that perfect loaf. I'm writing this article to stress
how important temperature is in bread baking.
My seven pound loaf is made using three two pound bread machines. First, I make
a sponge. A sponge is also known as a starter - same thing. I take three cups of warm water and put it in a mixing bowl. Then
add one tsp of active dry yeast. Then add three cups of bread flour. I mix it
with wooden spoon and put a plate over the top and put it in the fridge over
night. (Always use a wooded spoon! - It's tradition only.) Temperature is not
important at this point.
First thing in the morning I take the sponge out of the fridge and feed it. The
sponge is now all bubbled up and ready for the next phase of the process. I put
in one half cup of bread flour and one half cup of warm water and mix it with my
wooden spoon. The flour I add is the food. Then I put the
bowl in the sink with the plate covering the top and fill the sink with warm
water. I want to bring the temperature of the sponge starter up. Every twenty minutes
I drain the water and add new warm water to the sink. After about an hour my
sponge starter is ready to go. The dough is warm. When the dough first came out of the fridge
it was too cold to be used at that time.
This part is really interesting. I take my three two pound bread machines and
put two cups of warm water in each one. Turn on the machines and let then run
for twenty minutes. This is to warm them up. I used to make thirty two pound
loaves on a Sunday. It was an assembly line operation. I found that the first
batch, the first three loaves, were the runt of the litter. The machines were cold. That is
why we run the machines with warm water for twenty minutes before starting the
dough making process.
 Now it's time to make the dough. I put one cup of water at 112 degrees, measured
with a candy thermometer, in each machine and add a heaping TBS of active
dry yeast and two TBS of molasses. Put one third of the sponge in each machine.
Put one cup of bread flour in each machine and then add a heaping
tsp of salt and a TBS of oil to each machine. At this point the machines are too
hot and will not start. I remove the bread pans from the machines and take an ice cube and put it on the
temperature sensor on the inside bottom of the machine for a few seconds. I put the pans back in. That does the trick. I press go
and the machines start mixing. I add one half cup of pumpernickel rye meal, one
half cup of dark rye flour, three TBS of caraway seeds, one
half tsp of dill and one quarter tsp of garlic powder to each machine. I use a
cake frosting plastic spatula to help mix things up in the machines by hand. It speeds
up the process and gives me better kneading. I add bread flour as required until
I lose the glossy look on the surface of the dough and get the right touch. The amount of bread
flour is variable to an artisan baker and based on look and touch as explained
in my series.
Now it's time to make the dough. I put one cup of water at 112 degrees, measured
with a candy thermometer, in each machine and add a heaping TBS of active
dry yeast and two TBS of molasses. Put one third of the sponge in each machine.
Put one cup of bread flour in each machine and then add a heaping
tsp of salt and a TBS of oil to each machine. At this point the machines are too
hot and will not start. I remove the bread pans from the machines and take an ice cube and put it on the
temperature sensor on the inside bottom of the machine for a few seconds. I put the pans back in. That does the trick. I press go
and the machines start mixing. I add one half cup of pumpernickel rye meal, one
half cup of dark rye flour, three TBS of caraway seeds, one
half tsp of dill and one quarter tsp of garlic powder to each machine. I use a
cake frosting plastic spatula to help mix things up in the machines by hand. It speeds
up the process and gives me better kneading. I add bread flour as required until
I lose the glossy look on the surface of the dough and get the right touch. The amount of bread
flour is variable to an artisan baker and based on look and touch as explained
in my series.
When the machines are done mixing and kneading the dough I let the dough sit in
the machines to relax for a few minutes. Then take the dough out and braid the three
two pound plus loaves into one big ball of dough and put the seven pound dough
ball on a fifteen inch oiled deep dish pizza pan. I sprinkle meal on the top of
the loaf and then make a tic-tac-toe pattern
on the top of the loaf with a sharp knife. I don't bother with a first rising.
The loaf goes right into the oven at the optimum time. The loaf is light and great for ham and
cheese sandwiches. The size is for looks only and always impresses my friends. It looks like
something out of the middle ages.
Once the dough has risen, I put it in a pre heated oven at three hundred seventy
five degrees. I put my baking stone in the bottom of the oven on the lowest rung
during the pre heating. The loaf, in the fifteen inch pan, goes on the stone. When the loaf
first goes into the oven it gets oven shoot in the first few
minutes of baking. After twenty five minutes I put a tinfoil shield over the top of the
loaf to stop the top from burning. Total baking time is fifty two minutes. The baking
stone is used to stop the bottom from burning. After fifty two minutes I turn off the
oven and take the loaf out of the pan and put it back in the oven on the hot
stone. The loaf will
out gas warm vapors and wet itself if just left to sit on a rack outside the
oven. Keeping
it in the warm over dries up the vapors and keeps the crust artisan crispy.
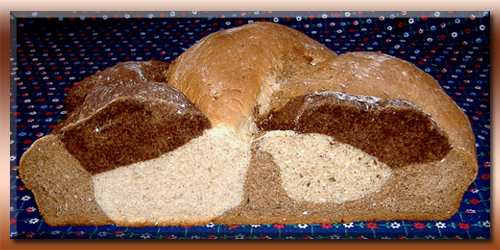
That is a loaf to brag about. Sometimes I make the loaf with one batch of white dough, (honey instead of molasses and no garlic or dill), one batch of dough as
described and one batch of dough with half as much caraway, ground, and two TBS of
non-flavored caramel coloring. That is the loaf pictured.
Look at all that was done to control temperature: Brought the starter to temperature by
letting it sit in the sink full of warm water; Ran the bread machines with warm
water in them for twenty minutes before starting; Used an ice cube to reset the
temperature senor on the machines; Measured the temperature of the water in each
machine with a candy thermometer; Left the loaf in the warm oven to dry out. I
have heard of people in Europe warming their flour in the oven before baking,
but that is another story. See how important temperature is? All the little steps
make a really big difference.
Learn more bread baking tips in the privacy of your own home and at your own
pace in my eight hour take at home baking class Video Bread Artisan Series.
Or maybe you want to learn how to master sourdough Video Sourdough.
More Tips
at the following links:
© Copyright
1990-2021 Video Bread
videobread@gmail.com
Better bread baking starts
with Video Bread. The recipe for success!